Friday, April 27, 2012

Egg-in-a-Pepper

Pin It
Oh so pretty outside today. We went to the French market along Wisconsin (a street right next to Georgetown). It feels so good to be done with exams and enjoy the outside like normal people! Nomm-ed on crepes, creole jambalaya, burgers, fries, macaroons and french bread :/ Yeah, that was too much food. Too weird of a mix. Upset stomach for the rest of the day. Ungh so much for being a glutton...

My interesting factoid of today is a little look into the future of food. Cloned animals with "leaner meat". First sheep ever cloned with "good fats" in China rather than "bad fats/ cholesterol". Apparently, the gene is straight from a ROUNDWORM that produces unsaturated fatty acids, which is better for you. I mean we have tomatoes with fish genes in them so we can freeze them... Are you ready to munch on some sheep-worm hybrid??

Last weekend, we decided to make something creative for brunch. We eat A LOT OF eggs. And we saw some great colorful peppers. But mostly I was browsing recipes and found egg bacon cups and avocado cups. And so why not pepper cups?? 
Beautiful, bright and derricious!

Egg-in-a-Pepper
Cooking level: Easy Peasy
Yellow, Orange, Green!

Ingredients
3 Bell peppers (or however many)
3 eggs
1/3 cup shredded cheese (sharp chedder or pepper jack)
1 tsp of any kind if herb
Salt/pepper


Preheat oven to 400F. We only used the bottom of the bell peppers. But you can also use the top part if you like.


In your cups, split the cheese, herbs, salt and pepper. Dried parsley, chili flakes works great. I'm sure chives would be very delicious and refreshing too.
I separated the egg whites while bubs mixed the cheese and herbs around and then plopped the egg yolk on top. Although, the next time I do this I think I'll put some egg white over the yolk so it doesn't dry out too much in the oven.

Stick those in the oven (it fits in the toaster oven!) for about 25-30mins or however you like your eggs.

Super simple huh?


Tuesday, April 24, 2012

Turkey Meatballs stuffed with Cheddar Cheese

Pin It
The weather was super awful in DC, but now it's shining and sunny again! WOo! except it's always nice when I have to study. I can only enjoy the sun through the library windows. Sobfest *whine whine whine*


But the sun makes me scream for ice-cream! This brings me to health mystery of the day. What makes you get brain freeze after chugging down a slurpee? 


If you don't get brain freeze, you're probably not eating your ice-cream right.


Apparently, a science paper presented at the experimental biology conference this year, showed that brain freeze is accompanied by a rapid dilation of the anterior cerebral artery. Blood floods the brain when it senses cold and the increase in pressure induces pain. These results would be even better if they could figure out a way to prevent it so I can eat my milkshakes without going OWWwww... But seriously, this paper has bigger implications, including curing migraines and headaches.

Bubs was gone for the weekend, so I made these meatballs solo! They're healthy and delicious. And very juicy. Try it out!

Turkey Meatballs - Cheddar cheese stuffed served with lentils
Meatballs served over lentils and a bed of spinach

Ingredients
Lentil side:
1 tbsp olive oil
2 cloves of garlic minced
1 can of Fire roasted tomatoes
1/4 sliced onion
1/2 cup lentils
salt, pepper, chili flakes

Meatballs:
1 lb Ground turkey
1 egg
1/3 cup breadcrumbs (or 1 slice of bread crumbled)
1/4 finely chopped onions
2 tbsp of dried parsley
2 tbsp of chili flakes
1 tsp dried garlic
pepper/ salt
Cubes of sharp cheddar (or brie)


Let's prepare the lentils first!
Heat up the olive oil in a pot and fry up the garlic and onions until slightly translucent. Drop in the can of tomatoes and add the lentils. Simmer that while you make your meatballs.


In a bowl, add in all the ingredients except for the cheese. Using your hands mash it all up and massage it real good.


Shape 1/2 a ball in your hand and press the cheddar cheese into the middle and cover it up with more meat. This should make around 13 decent sized meatballs (2 inch diameter).


Heat up some olive oil in a frying pan and sear both sides of the meatballs until you get that lovely brown.


I popped it in the oven at 350F for about 10-15 mins. But if you make small enough meatballs, then you can just fry it until cooked.

Then you're done! The lentils should have been simmering in the pot for 30 mins. Try it and the lentils should be soft but still give some chew.

Serve your meatballs over a bed of lentils.


Have fun with the herbs you can add and even the cheese. I first though to use some soft Brie but my neighbor can't stand strong cheese. So I stuck with cheddar.

Hope you guys like it!

Look at that oozing cheese!

Friday, April 20, 2012

Doenjang Jjiggae - Korean Miso Soup

Pin It
Happy 4/20 folks! I just realized it was high stoner holiday today... Not that it really matters. But what is really interesting is what I read in the news today.


Apparently, yogurt GROWS balls. Yeah...a recent study by scientists at MIT fed mice yogurt and they found that the testicles of yogurt consumers were about 5 percent heavier. WHAT?! So lay off the junk food unless you want your balls to shrivel up like raisins! HAHA


On the note of probiotics. I'm going to show you how to use Doenjang, which is Korean fermented soybean paste. It sounds really gross but it just doesn't have a pretty name like tempeh, miso or natto, which are all practically the same. And now it's time to present health related news of the day...


FERMENTED SOYBEANS > raw soybean products


Did you know that non-fermented soybean products like tofu contains lots of good nutrients like isoflavones that is not bioavailable to your bodies? Fermentation transforms your everyday soybeans into a superfood, that makes your gut happy with lots of friendly microflora. That sounds like great bowel movement to me :D And that also means a wealth of nutrients and boosting your immunity. 

Anyway, doenjang is considered one of the mother sauces in Korea. It comes from fermenting soybeans, then separating the liquids and solids. That liquid becomes your soy sauce and the remaining mashed beans become doenjang. 

It is really a gut warming and lovely soup, that cures hangovers and all kinds of ailments. Haha ok I guess I should write a disclaimer. Just because I put it in my blog and I believe it, doesn't mean its 100% true 'kay? So don't sue me :)


Doenjang Jjigae - 된장 찌개
Sorry for the blurry images! My DSLR is at home and not here in DC :(

Ingredients
1 large piece of kelp/ kombu (3x3')
6 dried anchovies (opt out for vegetarians and vegans)
2 cups water
1/2 diced onion
1/2 chopped up chilies (serrano, jalapeno, whatever tickles your fancy)
1/2 diced zucchini
1/2 block of tofu
1/2 pack of enoki mushrooms (or any kind)
1 stalk of green onion

2-3 tbsp doenjjang (Korean miso/ bean paste)
1/2-1 tbsp gochujang (Korean chili paste)
2 tsp Korean chili powder
salt/ pepper to taste


There are 3 ways in which you can flavor your soup.
Bring to boil in a pot 2 cups of water and...
1. A large piece of kelp (vegetarians)
2. Kelp and anchovies
3. A palm size amount of chuck meat (fry this in garlic and oil first before adding water)

The picture to your left shows the net device I talked about earlier so you can easily take out the anchovies once you're done with it. But I'm lazy so I just leave it in there and fish it out while I'm eating :/


So now you've chose one of those three options and the water should be heating up on medium high.

Prepare all the vegetables and tofu. I like to dice them, but whatever shape tickles your fancy.


Once the water starts boiling, add your onions and zucchini. Let it boil for a good 7 mins before you add your chilies, chili powder, doenjjang and gochujang.

Bring to boil again (2 mins) and add your tofu. Boil that for around 3 mins and add your mushrooms. Taste it now. If you want it saltier and deeper in flavor you can always add more doenjjang or a pinch of salt.

Garnish with some spring onions and enjoy with a steaming bowl of rice!


Tuesday, April 17, 2012

Kongnamul Bap - Beansprout Rice

Pin It
Woo, just finished an exam! I can finally update! I'm super stoked that people are starting to read my blog. I hope for your sake that it'll get better over time. Let me know in the comments if you want to see something happening in my blog. I can't always guarantee it though...but I'll try not to flake :D

Let me do a health myth buster today....
MYTH: Wearing an underwire bra increases your risk of getting breast cancer

I don't know how many girls have heard this growing up, but I certainly did. I used to be one of those geeky, awkward girls in middle school wearing oversized t-shirts to hide a few lumps (wait... still awakard..no change there). I used to be so embarrassed about boobs and wore bras even in my sleep. Is this TMI?! haha too bad. Anyway, I remember having a sleepover one day and my friend told me I could get breast cancer from doing that. And I totally freaked out and decided to just go braless for the rest of my life... yeah 

But seriously there are claims that the wire compresses the lymphathic system and cause toxins to accumulate and thus cause breast cancer. Bogus. All you ladies out there, feel free to wear a bra however loose or tight fitting it may be.

OKAY. No more boobies. More food. Kongnamul bap is almost like bibimbap except that it's easier to make because unless I'm at home, I have no extra assortment of veggies I can use to mix into my rice. This is a healthy one pot meal that requires almost no work (even less work if someone else does the dishes :D). 


Kongnamul Bap - 콩나물밥
Adapted from Maangchi

Ingredients
1 cup uncooked rice (mix of purple, white or all white)
1 cup water
2 - 3 cups beansprouts
2/3 cup ground beef (a little more than fist sized..a lady's one)
1.5 tbsp soysauce
1 tsp sesame oil
Pepper
1 chili (serrano, jalapeno - optional)

Sauce
1/4 cup soysauce
1/4 cup Youndoo (sweet soysauce or just use all soysauce)
1 tbsp minced garlic
1-2 stalks Green onion chopped
2 tbsp Korean chili pepper
1 tsp honey (or sugar)
1-2 tsp sesame oil
1 tbsp roasted sesame seeds (optional)


Let me begin by letting you know how I cook my rice on the stovetop. Of course, I'd prefer using a rice cooker but I couldn't haul my singing/ talking rice cooker from LA (so asian, and so sad :\). I like to use a mix of 7 grain rice and white rice in a 1:3 ratio. If you do use a mix, remember to soak your rice at least an hour before making this.

I'll wash my rice and instead of using measuring cups and what nots, I'll just cover the rice with water just enough so that the water level hits my knuckles (picture to left). I swear by this method and it works for any size hand, any pot and even the rice cooker. Fo realz. Then cover it, heat on high. When it starts to boil, turn the hit super low. And your rice should be done in 25-30 mins!

OK...NOW FOR THE RECIPE
Take your uncooked rice, wash it and soak it for at least 30 mins. This includes all blends of rice or all white. Put that aside. The water level doesn't matter right now.

Marinate your meat (or skip this to make it veg) with a pinch of pepper, sesame oil and soysauce. Set this aside.

Wash your beansprouts and pick out all the nasty looking ones.


Now, let's make the sauce. This is for flavoring your kongnamul bap after it's cooked. Just mix all the ingredients under the sauce label and you're good! As you can see the dish is not very seasoned and you can adjust how much sauce you add in to your finished bap. I usually make a huge tub of this sauce just to keep in the refrigerator! You can dip your mandu (potstickers/ dumplings) in it, stir fry tofu with it etc...


Yay, now the fun stuff. So after the rice has been soaking for 30. You can drain some of the water or add water until the level is below what you normally put in. (say not your knuckles, but the next finger joint distal to that). Or if you're anal, drain your rice until there is no water and add in 3/4 cup water. On top of your rice, pile on the beansprouts and then the meat. I also added in some chilies over the meat.

If you don't like the idea of putting raw meat over your veggies and rice, you can always fry it first and then put it on top later.


Cover that and let it boil for 10 mins over medium-high heat. Then using a huge rice scooper, give it a good whirl, recover it and set the fire to low. Simmer for around 12-15 mins with the lid still over it.


And that's it! SO simple. Serve it in a bowl with a runny egg on top and some lovely greens. Pour in your sauce according to taste (maybe like 1/2 tbsp per serving). I don't like things salty, so its up to your discretion.

Enjoy!

Friday, April 13, 2012

Oatmeal Ricotta Choc Chip Cookies

Pin It
So I was thinking that I should do health myth busters or some factoid about medicine in each post. Ya know... just going along with the MD theme. For those who have asked. MD stands for Medicinae Doctor (latin). Like how JD stands for Juris Doctor, a law degree. So yea.. I realized people didn't get my blog name.. "does that stand for Mabel Dddd...duhhhh iono???!" 
@$&*@% it doesn't.

Soo.. I give you Health caution of the day. Don't Double Dip.
Studies show that every 3 times you dip that chip back into that delicious green salsa, that's 10,000 bacteria going from your mouth and to that reservoir of GERMS. And then imagine that going back into your mouth when everyone else has dipped in it maybe 2983 times?? 
HMM delicious. 

BUT that doesn't stop me from dipping my fries into mah ketchup a gazillion times. Ketchup is so damn good! Like suck it out of their packets good! What? Ketchup has 7% of my daily sodium intake in a tbsp? *shrug*

Bacteria, germs and what not. Now aren't you in the mood for cookies?? :D
These cookies are like pillows and healthier-than-your-mum's cookies. Only 2 tbsp of butter and 2 tbsp of olive oil in two dozen of these bad boys. My taste-tester bubs thought a stick went in. A good use to that left over ricotta you had making pasta. Give it a whirl!

Oatmeal Ricotta Chocolate Chip Cookies
Chocolate chips!!!

Ingredients
1 cup flour
1 tsp baking powder
1 tsp cinnamon
1/2 tsp soda
1/2 tsp salt
2/3 cup Brown sugar + 2 tbsp white sugar
1⅓ cup Quick cooking oats (instant, rolled)

2/3 cup Ricotta
1/3 cup Yogurt (or just 2/3 cup yogurt w/o ricotta)
2 tbsp Vegetable oil + 2 tbsp melted butter
1 Egg
1 tsp Vanilla
1/2 cup Chocolate chips
1/2 cup Nuts (optional)


I apologize for the lack of pictures, but I forgot about that while mixing my ingredients!
Anyhoo, mix all your dry ingredients from flour to oats in a large mixing bowl.

In a separate medium sized bowl, mix your wet ingredients (from ricotta to vanilla) until smooth. I melted my butter in the microwave for ~10 secs.
Then, add your wet to your dry ingredients and mix until no lumps or dry spots. The batter appears to be really dry but that's okay. The cookies come out really moist!

Fold in your chocolate chips and nuts if you like. Dried fruits like raisins are also yummy.

Bake them for 11-13 mins at 350F. Or until the edges are a little bit brown. These cookies appear a little pale because of the ricotta. So don't over bake them!

Leave them to rest on the tray for 5 mins and then leave them to cool.
Makes about 24 healthy cookies!


I enjoyed it with some tapioca pudding...nomzzz

Wednesday, April 11, 2012

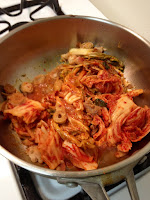
Kimchi Jjigae/ Stew - 김치찌개

Pin It
Last week bubs and I went shooting for the first time. Well, first time for me. And I mean real shooting, with REAL guns. No bb guns, laser tag or nerf guns :P. We did a round of 9mm bullets so there was a good amount of recoil. It was so... powerful! I felt like an FBI agent loading my gun. I probably didn't look like one though... Jumped at the sound of the first bang and took forever to focus. Oh my goodness was it loud. Even with earmuffs I felt like I was going to go deaf. I'd like to say that I would have done better than bubs if I had my glasses with me haha. But I think I did pretty dece... if I say so myself (no shortage of confidence here).


We made Kimchi jjigae yesterday because the weather is so bloody cold. DC weather is so stupid >:( It was hot, then it's cold. Yes, then you're no...  ♪ ♫ ♪ ♫ Just kidding, I'm not going to sing. But this stew is soo easy to make. Especially when you buy a huge tub of kimchi from the korean store and you think you're going to finish the whole thing. But in reality you never eat at home and always buy take out (#truelyfe). You must use old ass kimchi where the cabbage looks a little grey and it tastes really sour or else your soup won't taste very good. Trust me. You can also change it up and add seafood or meat or keep it really simple with neither. Enjoy!

Kimchi Stew 김치찌개

Ingredients
1 tbsp sesame oil
1 tbsp minced garlic
Palm size amount of meat (or none if you want to keep it veg)
1.5 cup OLD kimchi
4 tbsp kimchi juice
5 anchovies (or vegetarians use shiitake mushrooms for that umami)
2 cups water

1/2 zucchini
1/2 pack of firm tofu
1 pack enoki mushrooms
1/2 tbsp korean chili powder + serrano/jalapeno chilies (optional for some extra heat)
1 stalk of green onions


In a huge pot heat up the sesame oil and garlic and throw in your meat. We used pork belly (ssamgyup ssal), but you can use other scraps of meat like chuck, strips of pork. Throw in your kimchi to fry for a bit (makes it more fragrant) and add your water and kimchi juice. You can prepare the dashi water (anchovies and 2 cups water) before hand or just add the anchovies to the pot and you can fish them out later.

Oh also using old kimchi is KEY. It has to be sour!


While it's boiling chop up your zucchini, tofu into cubes, green onions and enoki mushroom. You can add your zucchini first because that takes a while to soften.


Add the korean chili powder and toss in chopped up serrano or jalapeno chilies for extra spiciness HMMm.


After maybe 15 mins of it boiling, add the tofu. Let it boil again and then add the enoki mushrooms and green onions.

You can taste the soup and you can adjust the saltiness with more salt or add kimchi juice.

Boil for another minute and then it's ready!


Sunday, April 8, 2012

Lemon Blueberry Ricotta Pancakes

Pin It
Happy Easter guys! Today, we decided to have Easter brunch with my neighbor after going to church. Finally stepped foot into a church, after being MIA for... uhh... G-d knows how long. Although, I did go to a church of the wrong denomination. You see bubs is Catholic and I'm Presbyterian, but we didn't want to go to two churches or go alone.. haha I'm so awful.

Anyhoo, I've been wanting to make these pancakes after trying them at the BLD restaurant for brunch in Los Angeles. They are SO fluffy, moist and full of good stuff. I think the next time I make it though, I'll probably use vanilla yogurt, because plain is a little too tart, or a mixture of both. Our neighbor came to join us and he made some bomb ass potato hash. It was loaded with bacon, green pepper, onions, garlic. Maybe some butter in them too. I hope you try out these pancakes on one bright and sunny morning!

Lemon Blueberry Ricotta Pancakes
Blueberries, maple syrup, pancakes oh-my!

Ingredients
1. 1.5 cup all-purpose flour
2. 2 tbsp sugar
3. 1 tsp baking powder
4. 1/2 tsp baking soda
5. 1/4 tsp salt
6. 2 eggs separated
7. 1.3 cup buttermilk (or yogurt or substitute..see below)
8. 1 tbsp lemon juice + zest
9. 1/8 tsp vanilla extract (optional)
10. 1 cup ricotta cheese
11. 1-2 cup blueberries


Mix all the dry ingredients from 1-4 in a big bowl. In a medium bowl mix your butter milk, egg yolks, lemon juice + zest (~1 tbsp), vanilla extract and ricotta cheese. If you don't have buttermilk, you can make it by adding in a measuring cup a 1 tbsp of lemon juice or vinegar and then topping it off up to 1 cup with milk (2% or whole). Let that sit for 5 mins to curdle and get thick. I just use the same amount of yogurt (plain or vanilla).


In another bowl where you separate your egg whites, add in the salt. If you're lucky and have an egg beater, beat the eggs until soft white peaks form. Otherwise use the power of 2 alternating guys whisking it!


Mix until JUST moistened or free of lumps of the wet and dry mix. Then gently fold in your egg whites. I mean gently, no crazy whisking. Or else all that air and blood and sweat you had put in whisking the egg whites just deflate (and that's sad).


Fold in your blueberries and heat up your frying pan!
We used a pat of butter and olive oil and keep your fire at low-medium heat. I used a ladle to pour it on so it spreads to my hand span. I did make them really big and made a mess because I couldn't flip them :(


While it's cooking on one side you can add more blueberries or some chocolate chips (picture below). HmmMMM... Once it starts having a decent amount of bubbles forming upside, flip it over (or whenever it looks brown and delicious).


Serve your pancakes with maple syrup and maybe a dollop of ricotta cheese. You can even make your own syrup and blueberry compote. But that's too bouge for us :D

Pancakes enjoyed with some scrumptious potatoes

Friday, April 6, 2012

Mackerel Jjorim - 고등어조림

Pin It
Yay Easter break! And yay for going to a catholic school! We get good Friday off and Monday off. Although I have so much catching up to do for our neuroscience class. Telencephalons, neurons, meninges gahh *brain fart*. I can see that I haven't been posting as frequently as I used to :/  I hope it doesn't become a habit. I'm just a lazy writer, but we've still been cooking up some delicious meals.

Ooh I also watched Hunger games the other day and I think the girl who played Katniss is so very hot. But bubs doesn't. Now I don't trust his taste in woman...what does that say about me??!! >:(  haha but we both agree that the baker's son was a total miscast. I was thinking more big, burly, blond and hunky! I want more eye candy in the movie!!

Anyway, I'm going to show you how to make Mackerel Jjorim, which is just this lovely blue fish packed full of nutrients. My mum used to tell me that the Japanese are smart because they always eat this fish, which is full of omega 3 and DHA. I've been eating it like it's my job ever since... I'm still waiting to become Einstein... Who knows.. maybe one day

Spicy Braised Mackerel - 고등어조림


Ingredients
Main
1. 1 Mackerel
2. 6 anchovies
3. 1 cup of Korean radish
4. 1/2 Onion
5. 1 stalk green onions
6. 1 serrano chilli finely chopped

Sauce
1. 2 tbsp Gochujang (Korean chili paste)
2. 1 tsp minced ginger
3. 1 tbsp minced garlic
4. 1 tbsp White vinegar
5. 2 tsp Korean chili powder
6. 2 tsp black pepper
7. 3 tbsp mix of Yoondu + soysauce (or all soysauce)


Cut up your radish like the picture above, slice up the onions and the green onions. Our mackerel comes already split in half (like butterflied) and then just cut that up into thirds.

In a huge pot, put in 2 cups of water, anchovies and radish. Boil that for 10 mins, while you mix all the sauce ingredients together in a separate dish.


Lay out the fish on top of the radish as shown in the picture to your left. Pour the sauce over it. DON'T stir it. Just leave it alone for 5 mins. Every now and then, use a spoon to ladle over your fish so that it mixes with the sauce and helps cook your fish.

Your fire should be medium high through out cooking.

So after 10 mins, add in your sliced onions and keep ladling the soup. We added 1 serrano chili here for extra spice and juice of a 1/4 lemon to add acidity to the fatty fish (good fats!). The soup should start turning red and reduce to half the amount.

Once the soup is significantly reduced, add your green onions on top. Make sure your fish is cooked too! Ladle soup and let it boil for another 5 mins.

At this point, your onions and radish should be soft and fish should be cooked. You can adjust the sauce by adding salt or more pepper.


The sauce is really good when you pour it over your rice. MMM delicious-ness. A perfect complement to a huge bowl of steaming rice. Enjoy~ and get in your Omega 3s!!